TEXMAKER

Free cross-platform LaTeX editor since 2003

(Windows, MacOsX, Linux)

DOWNLOAD version 5.1.4

"Powerful, easy to use and elegant"


Texmaker : User manual

Contents

1. Configuring Texmaker
Before using Texmaker, you must configure the editor and latex related commands via the "Configure Texmaker" command in the "Options" menu ("Preferences" under macosx).

1.1 Configuring the editor

Before compiling your first document, you must set the encoding used by the editor ("Configure Texmaker" -> "Editor" -> "Editor Font Encoding"). Then, you should use the same encoding in the preamble of yours TeX documents (example : \usepackage[latin]{inputenc}, if you use the "ISO-8859-1" encoding for the editor)
Note : while opening a file, you're warned if the document can't be decoded correctly with the default encoding and the program lets you choose an other encoding (without modifying the default encoding) .

1.2 Configuring the latex related commands

Texmaker can't compile yours documents if the paths to the LaTeX related commands are wrong.
The default settings should work with the recent and standard LaTeX distributions, but you should have to modify them ("Configure Texmaker" -> "Commands"). To change a command, just click on the button at the end of the corresponding line and select the command in the file browser : texmaker will adapt automatically the syntax of the command.
The % character represents the name of the file without the extension (the master document in the "master" mode) and the @ character will be replaced by the current line number.
Additional parameter : # will be replaced by the current file name without extension (even in the "master" mode) and ! will be replaced by the current directory.

Remark : if the %, !, # and @ characters are required for a command, just use %%, !!, ## and @@. These expressions will be replaced by %, !, # and @ respectively before launching the command.

1.3 Configuring the spell checker

The spell checker uses the Hunspell/OpenOffice.org (version 2.x) dictionaries.
To configure the spell checker : "Configure Texmaker" -> "Editor" -> "Spelling dictionary" -> click on the button at the end of the line to select the dictionary with the file browser.
Warning : spell checking starts at the cursor position and not at the beginning of the document.
During typing, if there is an error, the word is underlined by a red underline. A right-click on the word opens a contextual menu in which there are some replacement suggestions. Click on the desired word to make the replacement.


2. Editing a TeX document

2.1 Usual commands

The standard commands (cut, copy, find...) can be launched via the "Edit" menu and the "Edit" toolbar.
Block selection is available by using the Alt key while moving the mouse cursor.

2.2 Setting the preamble of a TeX document

To define the preamble of your document, you can use the "Quick start" wizard ("Wizard" menu).

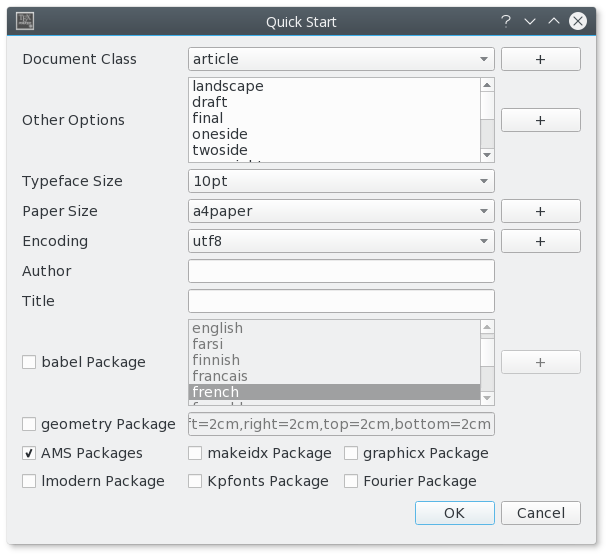
This dialog allows you to set the main features of your document (class, paper size, encoding...).
Note : You can add other options by clicking the "+" buttons. All yours settings are recorded.

You can also type your own preamble model in the editor : with the "Copy/paste" or "Save As" commands, you can use it for a new document.

2.3 Structure of a document

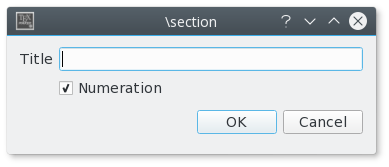
To define a new part (section,subsection...) in your document with Texmaker, just use this combobox in the toolbar :

This will cause a dialog to pop up which allows you to define the style of the part (section,subsection...).
Note : the "Structure View" is automatically updated.

2.4 Browsing your document

The "Structure View" (left panel) lets you quickly reach any part of your document. All you need to do is to click on any item (label, section...) and you will be taken to the beginning of the corresponding area in the editor.

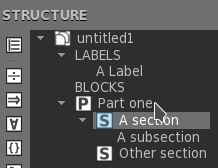
The "Structure View" is automatically updated while typing. You can also use the "Refresh Structure" ("Edit" menu) command at any moment.

For each file, three bookmarks can be used to speed up navigation : just click on a line number to add or remove a bookmark. When you have already defined three bookmarks, you must remove one of them to add a new bookmark. To jump to the line corresponding to a bookmark in the editor, just click on the buttons in the status bar.

2.5 Formatting your text

You can quickly set the format of a part of your text with this :

Additional option: a selected text can be directly framed by certain environments. Example: while clicking on the button "Bold" after having selected the word "Hello" , you will obtain the code: \textbf{Hello}.
This option is available for all the environments indicated by "[selection]" in the "LaTeX" menu.

2.6 Spacings

The usual "spacing" commands are available in the "LaTeX" and "Math" menus. To insert quickly the "new line" LaTeX command, you can use the corresponding command in the toolbar (shortcut : Ctrl+Alt+return)

2.7 Inserting a list

The usual list environments code can be insert quickly via the "LaTeX-List" menu.
Note : the shortcut for the \item command is Ctrl+Shift+I.

2.8 Inserting a table

With the "Tabular" wizard ("Wizard" menu), the LaTeX code for a tabular environment can be quickly inserted :

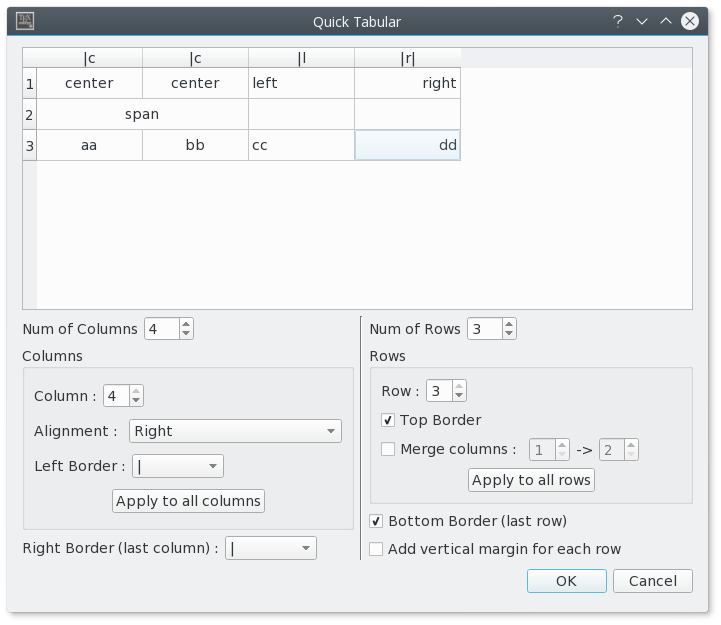
You can set the main features of your table.
Note : this dialog allows you to type directly the code in the cells.
The corresponding LaTeX code is automatically inserted in the editor.

2.9 Inserting a "tabbing" environment

To help you to insert a "tabbing" code, you can use the "Tabbing" wizard ("Wizard" menu) :

2.10 Inserting a picture

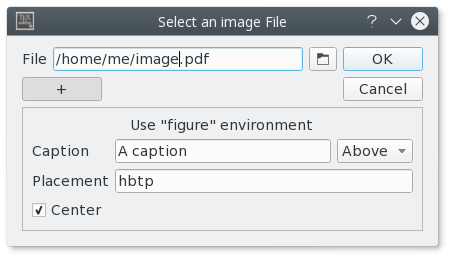
To insert a picture in your document, just use the "\includegraphics" command in the "LaTeX" menu. Then, click on the "browser" button in the dialog to select the graphic file.
Note : if you click on the "+" button, a "figure" LaTeX environment will be added automatically.

2.11 Cross References and notes

This toolbox in the toolbar allows you to insert quickly the label, cite, ref, footnote... code.
Note : the labels used in your documents are displayed in the "Structure View".

Additional option:for the \ref command, a dialog box allows you to select directly the label.

2.12 Inserting math formulae

You can toggle in the "in-line math" environment with the "$$" button in the toolbar (shortcut : Ctrl+Alt+M) or with the "Math" menu. The shortcut for the "display math" environment is : Alt+Shift+M.
The "Math" toolbar allows you to insert the most currents mathematical forms (frac, sqrt...)

With the "symbols panels" in the structure view, you can insert the code of 400 mathematical symbols and the \left and \right tags..(just click on the "symbols" buttons in the structure view)

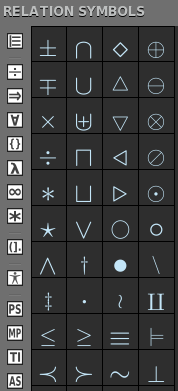
Additional option: A "favorites symbols" (*) panel allows you to define your own "symbols panel".

  • To add a symbol to the "favorites symbols panel", just right-click on a symbol in the others "symbols panels" and select "Add to favorites" in the pop-up menu.
  • To remove a symbol in the "favorites symbols panel", just right-click on it and select "Remove from favorites" in the pop-up menu.

You can also define the format of your mathematical text via the "Math" menu.
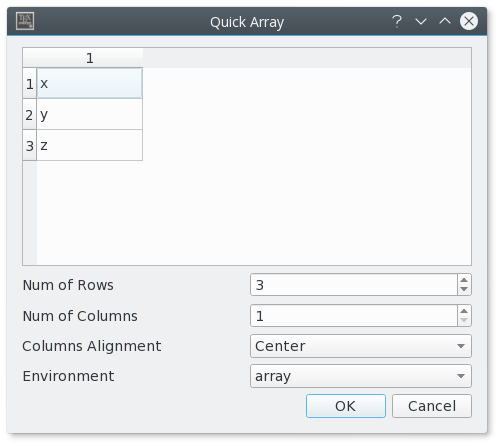
For the "array" environments, a wizard (like the "Tabular" wizard) is available in the "Wizard" menu. With this wizard, you can select the environment : array, matrix, pmatrix.... The cells can be directly completed.

2.13 Using the "•" place holders

The "•" place holders, automatically inserted by some Texmaker commands, allow you to reach directly the next field in the created structure by using the "Tab" key ("Shift+Tab" to go backward).
Note : inserting a tabulation with the "Tab" key is deactivated if the line contains a "•" place holder.


3. Compiling a document

3.1 Compiling

The easiest way to compile a document is to use the "Quick Build" command . You can define the sequence of commands used by the "Quick Build" command via the "Configure Texmaker" dialog.

To launch a command from the toolbar : select first the command, then click on the "Run" button.

You can also launch each command one by one (shortcuts : F2...F12 - see the "Tools" menu).
Note : the "Clean" command in the "Tools menu" allows you to erase the files (dvi, toc, aux...) generated by a LaTeX compilation (except the ps and pdf files).
Warning : all yours files must have an extension and you can't compile an "untitled" file or a file with a space in his name.

3.2 The log files

With the "Quick Build" command, the log file is automatically displayed in the "Messages / Log file" pannel. While clicking on a number in the "Line" column, the cursor is placed on the corresponding line in the editor and the error is displayed.
Remark : a summary of the latex errors and warnings is displayed before the full log file.

The "Next Latex Error"and "Previous LaTeX Error" commands allow to get to the errors detected during compilation :

3.3 Synchronization source-pdf with Synctex

If you add the "-synctex=1" option to the pdflatex command, the built-in pdf viewer will jump directly to the position in the PDF file that corresponds to the current line in the (La)TeX source file.
Reciprocally, with a right-clic on a word in the built-in pdf viewer (context menu), the editor will jump to the corresponding line in the source file.
Remark : if you press the ctrl+space key (ctrl+$ on MacOsX) in the built-in pdf viewer, the focus go to the editor.


4. Other features

4.1 Folding/unfolding parts of the document

Texmaker allows you to fold/unfold all \part, \chapter, \section,.., \begin{foo} \end{foo} blocks in your document. To do that, the cursor must be localized in the first line of a block ("contextual code folding"). Then, you have just to click on the "-" icon to fold the corresponding block.
Note : you can also use the contextual menu to jump directly to the end of the block.

4.2 About documents separated in several files

Texmaker allows you to work onto documents separated in several files.
To include a TeX file into your document, just use the "\include{file}" command in the "LaTeX" menu. The file will appear in the "Structure View". With a click on his name, Texmaker will open it.

Then, you can define your "master document" with the "Options" menu. All the commands of the "Tools" menu will apply only to this document even when working on the "children" documents (you can even close the "master" document).
You can easily switch toggle between the master document and the current document via the corresponding button (just above the "Bold" button).
Note : you can leave the "master" mode with the "Options" menu.

4.3 Bibliography

While opening a .tex document, the detected .bib files are parsed automatically and the bibliography references are added to the auto-completion. The list of the bibliography references can be refreshed via the "Update Bibliography" option of the "Edit" menu.

For the "bib" files , the "Bibliography" menu enables you to directly insert the entries corresponding to the standard types of document.
Note: the optional fields can be automatically deleted with the "Clean" command of the "Bibliography" menu.

4.4 Personals tags and tools

Texmaker allows you to insert your own tags (shortcuts : Shift+F1...Shift+F10). These tags are defined with the "User - User Tags" menu.
Notes :

  • If the code of the menu is "%environment", Texmaker will directly insert:
    \begin{environment }

    \end{environment }
    and the cursor will jump directly to the "•" field.
  • You can also define an unlimited number of tags via the "User" panel in the "structure view" : just right-click on this panel to add or remove an item.
    All theses tags can be included in the document by clicking on an item in the panel or directly with the keyboard trigger ":foo" + key right.
  • All the "@" characters in the code are automatically replaced by "•" place holders in the editor and the cursor will jump directly to the first "•" field (if some text has been selected in the editor before, the first "•" field will be replaced automatically by the selected text).
    Note : @@ will be replaced by the @ character in the editor (and not by a double placeholder)

You can also launch your own commands (shortcuts : Alt+Shift+F1...Alt+Shift+F5). These commands are defined with the "User - User Commands" menu and can be launched via the toolbar ("Run" button) .

4.5 Pstricks/Metapost/Tikz/Asymptote support

Some of the main Pstricks/Metapost/Tikz/Asymptote commands can be inserted via the "PS", "MP", "TI" and "AS" buttons in the "Structure View".
The "mpost" and "asy" commands can be launched via the "Tools" menu or via the "Run" button.

4.6 Change the interface language

The interface language can be changed via the "Options" menu (restarting the application is required).

4.7 The "Restore previous session" command

If you quit the program without closing the opened documents, texmaker records automatically the names of these documents. With the "Restore session" command in the "File" menu, all these files can be re-opened in one click.

4.8 "Forward/Inverse search" with Texmaker

Some dvi viewers can jump to (and visually highlight) a position in the DVI file that corresponds to a certain line number in the (La)TeX source file.
To use this feature, you can use the @ character in the syntax of the dvi viewer command ("Configure Texmaker" -> "Commands").
Example ("Forward search"):

  • To launch yap from texmaker : "C:/Program Files/MiKTeX 2.9/miktex/bin/yap.exe" -1 -s @%.tex %.dvi
For the opposite operation ("Inverse search") :
  • To launch texmaker from yap : "C:\Program Files\Texmaker\texmaker.exe" "%f" -line %l (the program arguments : "%f" -line %l )
  • To launch texmaker from xdvi : xdvi -editor "texmaker %f -line" %.dvi -sourceposition @:%.tex

4.9 Synopsis of the texmaker command

texmaker file [-master] [-line xx] [-insert foo] [-n] [-dpiscale x]
With the "-master" option, the document will be automatically defined as a "master" document.
With the "-line xx" option, Texmaker will ask you if you want to jump to the xx line after loading the document.
With the "-insert foo" option, a latex command (foo) can be inserted by an external program to the current document while texmaker is running.
With the "-n" option a new instance of Texmaker is launched (will break synchronization with the pdf viewers).
With the "-dpiscale x" option the environment variable QT_SCALE_FACTOR will be set to x before building the GUI (same behavior than adding "export QT_SCALE_FACTOR=x" to the environment variables)

4.10 Keyboard shortcuts

Defaults keyboard shorscuts (*:can be modified - "Configure Texmaker" -> "Editor") :

  • "File" menu :
    • New : Ctrl+N
    • Open : Ctrl+O
    • Save : Ctrl+S
    • Close : Ctrl+W
    • Exit : Ctrl+Q
    • Restore previous session : Ctrl+Shift+F8
  • "Edit" menu :
    • Undo : Ctrl+Z
    • Redo : Ctrl+Y
    • Copy : Ctrl+C
    • Cut : Ctrl+X
    • Paste : Ctrl+V
    • Select all : Ctrl+A
    • Comment : Ctrl+T
    • Uncomment : Ctrl+U
    • Find : Ctrl+F
    • Find next : Ctrl+M
    • Replace : CTrl+R
    • Goto line : Ctrl+G
    • Check spelling (from cursor) : Ctrl+Shift+F7
  • "Tools" menu :
    • Quick build : F1
    • Latex : F2
    • View dvi : F3
    • Dvi->PS : F4
    • View PS : F5
    • Pdflatex : F6
    • View Pdf : F7
    • PS->Pdf : F8
    • Dvi->Pdf : F9
    • View log : F10
    • Bibtex : F11
    • Make index : F12
  • * "LaTeX" menu :
    • * item : Ctrl+Shift+I
    • * Italic : Ctrl+I
    • * Slanted : Ctrl+Shift+S
    • * Bold : Ctrl+O
    • * Typewriter : Ctrl+Shift+T
    • * Small caps : Ctrl+Shift+C
    • * Emphasis : Ctrl+Shift+E
    • * New line : Ctrl+Return
  • * "Math" menu :
    • * Inline math mode : Ctrl+Shift+M
    • * Display math mode : Alt+Shift+M
    • * Numbered equations : Ctrl+Shift+N
    • * Subscript : Ctrl+Shift+D
    • * Superscript : CTrl+Shift+U
    • * Frac : Alt+Shift+F
    • * Dfrac : Ctrl+Shift+F
    • * Sqrt : Ctrl+Shift+Q
    • * Left : Ctrl+Shift+L
    • * Right : Ctrl+Shift+R
  • "User" menu :
    • User tags : Shift+F1...Shift+F10
    • User commands : Shift+Alt+F1...Shift+Alt+F10

4.11 The "Source Viewer" panel

To make easy copy/paste operations between two documents, users can open a document (in read-only mode) beside the editor with the "Source Viewer" panel.
A visual diff tool allows to see the differences between the current files loaded in the editor and in the "source viewer".

4.12 "Use a 'build' subdirectory..." option for (pdf)latex command

By using this option (configure Texmaker -> Commands), the "--output-directory=build" parameter will be automatically added to the (pdf)latex command and texmaker will search the log and pdf files into this subdirectory (the "build" subdirectory is automatically created by Texmaker).
Remarks :
  • For the others commands, user will probably have to replace "%" by "build/%". Otherwise, these commands will probably fail. Examples (on linux system) :
    • dvips -o build/%.ps build/%.dvi
    • ps2pdf build/%.ps build/%.pdf
    • bibtex build/%.aux
  • If this option is checked, the "clean" command will make a copy of the ps/pdf files from the "build" subdirectory to the current directory and will delete all the others files in the "build" subdirectory (the pdf file is not deleted because Texmaker uses it for the pdf viewer).

4.13 Replacing text with a regular expression

The parameter $1 must be used for the captured text and the "Regular Expression" option must be checked (click on the "+" button)
For example (to replace all the \textit{foo} by \textbf{foo}) :
  • "Find" field : \\textit\{([^}]*)\}
  • "Replace" field : \textbf{$1}

4.14 Using Texmaker as an Asymptote editor

  • For asymptote code embedded in a latex document, just use the "PdfLaTex+Asymptote+PdfLaTeX+View Pdf" mode for the quick build command.
  • Texmaker can also be used to edit and compile directly asymptote figure not embedded in a latex document. If the current document is an .asy file, the "Quick build" command (F1) will launch automatically the special "quick build" command for .asy files set in the configuration dialog.

4.15 Extending the editor's functionality with scripts

Advanced users can extend the functionalities of the editor by running scripts via the "User" menu.
  • Scripts must be written in javascript (qtscript).
  • Script files must have the .tms extension.
  • Available functions :
    • TM.text : returns all the text
    • TM.cursorPosition : returns the current position of the cursor
    • TM.selection : returns the selected text
    • TM.selectionStart : returns the position of the selection start
    • TM.selectionLength : returns the length of the selected text
    • TM.selectRange(start,length) : puts the cursor at the start position from the beginning of the document, and then selects as much text as indicated by the length parameter.
    • TM.insertText(string) : inserts string at the current position (and replace selected text by the string if some text is selected)
    • Public methods of the QPlainTextEdit object are also available.
Remarks :
  • to use TexWorks scripts, the TW.target prefix must be replaced by TM. .
  • script files can be located everywhere (the last used directory will be stored in the texmaker configuration file).


French version


Contact : Drop Us A Line